Some features only available with SCS-Standard and/or higher license levels.
Some properties and controls displayed in this panel will vary depending on other properties or options. Also, some properties may only be available if you have an SCS Professional or SCS Professional Plus license.
General
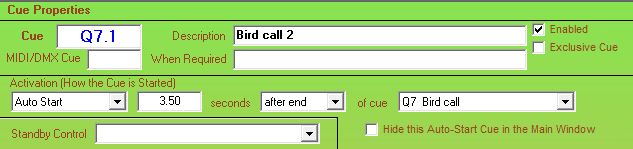
Cue: Enter your required identification for the cue, eg Q3 for 'Cue 3', FX 5 for 'Effect 5', or just the number of the cue, eg 27. You can also append decimals or alpha characters to the number, eg Q3.1, FX5A, etc. This field is also referred to as Cue Number and Cue Label.
When you add a cue SCS creates a default Cue Label which you can change if required. For example, if the previous cue label is Q3 then SCS will set the new cue label to Q4 unless that label is already in use. If the previous cue label is alphabetic-only, eg M, then SCS will set the new cue number to the next available alphabetic label.
If you want to re-number several cues then you can use the Re-Number Cues option available in the Production group of the Editor's ribbon bar.
Description: This is a free-format field into which you should enter a description of the cue. You may also find it useful to include the page number in the script. For example: "p32 - Grouse shooting". The details you enter in the Description will appear in the cue list in the upper part of the main screen. Note: You can leave this field blank and have it auto-populated from the Description of the first sub-cue.
Enabled: This field indicates if the cue is currently enabled, ie the cue is to be included in the Run window. All new cues are enabled by default. Clear the checkbox to disable a cue. A disabled cue will not appear in the Run window, and will be ignored during production runs. Unlike deleting a cue, disabling a cue leaves the cue available in the Editor and so can be re-enabled later if required.
MIDI Cue: This field is only displayed if in the General Options you have requested Control cues by MIDI input messages. Enter the MIDI Cue Number that will trigger this cue from an incoming MIDI message. If you want this cue excluded from MIDI triggering, leave the field blank. If you are using MIDI Cue Numbers then remember that for MIDI Control Message Types of Note On and Program/Controller Change then the MIDI Cue Numbers must be whole numbers in the range 1-127. This also applies to the MSC Fire Macro. For other MSC messages the MIDI Cue Numbers may have dot numbers, such as 1.2.3. The MSC format obviously supports far more cues than the other formats.
When Required: This is an optional free-format field into which you may enter details of when the cue should be started. Examples are: "3 seconds after blackout"; "When Leonard exits OP"; "Kipps: Thankyou, Mr Bunce!"
Exclusive Cue: Making a cue 'exclusive' makes sure your operator does not accidentally start another audio or video/image cue while this one is still playing. It is really just that - a way of reducing unintentional cue starts. If an exclusive cue is running then the 'Go' button is disabled if the cue displayed on the 'Go' button is or contains an audio or video/image cue. When the exclusive cue completes, the 'Go' button is then enabled if applicable.
Hot Key cues may be started while an exclusive cue is playing, but in keeping with the goal of the 'exclusive cue' property being a way to reduce unintentional cue starts, if a Hot Key cue itself is marked as 'exclusive' then this means that the Hot Key cue may not be re-started while it is playing. So if the operator accidentally presses the hot key twice instead of once then the second press will be ignored if the cue has the 'exclusive cue' property set.
Warn Before End: This checkbox is only displayed if in your Production Properties you have nominated a Give Visual Warning... time. This checkbox enabled you to turn on or off the visual warning for this cue. The default setting is 'on'.
Activation Method (first field in this section): Normally a cue will be started by you clicking the Go! button or right-clicking the mouse. This is a manual start of the cue and is indicated by selecting Manual (Go button) as the activation method. However, other Activation Methods are also available.
| Activation Method | Description |
|---|---|
| Manual (Go button) | The cue will be started by you clicking the Go! button or right-clicking the mouse. You may also assign a keyboard key (such as the space-bar) to the 'Go' function. See Key Mapping for details. |
| Auto Start | The cue is to be automatically started a given time relative to the start or end of another cue.
You will need to enter the following fields:
Auto Start Time (before the word 'seconds'): The time in seconds, eg 3.5, relative to the start or end of another cue that this cue is to be started. Activation Point (the next field): Select after start, after end or before end from the drop-down list. The before end option will start the current cue the specified time prior to the expected end of the controlling cue. Controlling Cue (after the words 'of cue'): Select from the drop-down list the cue that is to control the activation of the current cue. Hide this Auto-Start Cue in the Main Window: Select this checkbox if you don't want to see this auto-start cue displayed in the main window. If you select this checkbox for all your auto-start cues (which you can do using Bulk Edit) then in the Main Window you will only see your Manual Start cues (and any Time-Based cues). Example: If for Q4 you select Auto Start 4 seconds after start of Q3 then Q4 will automatically start 4 seconds after Q3 is started. Note that the duration of Q3 has no bearing on when Q4 is started. Sometimes you will want a cue to be activated immediately another cue stops or is stopped. In this case enter something like this: Auto Start 0 seconds after end of Q3. |
| A cue may alternatively be started by pressing a nominated key on the keyboard. This is known as a Hot Key. Hot Keys are useful for cues you want to start many times during the show, especially if the timing is fairly random. Three Hot Key modes are available: trigger, toggle and note. | |
| Hot Key (Trigger) | With a trigger hot key, when you press (and release) the nominated key the cue will start playing, and it will continue playing until the end of the cue, or until the cue is ended by another cue. If you press the key again while the cue is still playing, the cue will restart from the beginning.
For all Hot Key modes you will need to enter the following fields: Hot key: Select an available hot key from the drop-down list. Although the number keys 0‑9 are available in the list, be aware that the keys on the numeric pad may not activate a hot key if numeric lock is off. It is safer to stick to the alphabetic keys (A‑Z) and the function keys (F1‑F12). The caps lock key does not affect hot key recognition. Hot key label: Enter a label to be displayed in the Hot Key panel on the main screen. You should keep this label fairly short so you can read it easily. |
| Hot Key (Toggle) | With a toggle hot key, the nominated key 'toggles' the play state of the cue. Press (and release) the key to start the cue, and press the key a second time to stop or fade out the cue. So when you press nominated key, if the cue is not currently playing then the cue will be started, but if the cue is currently playing then it will be stopped (or faded out if the cue has a fade out time). |
| Hot Key (Note) | With a note hot key, the key is treated like playing a note on a synth. Press and hold the nominated key to start the cue. The cue will continue playing while you hold down the key. When you release the key, the cue will be stopped (or faded out). |
| Time-Based | The cue will be automatically started at a nominated time of day. See Time-Based Cues for details. |
| Cues may also be started using a two-step process, where a cue is intended to be started by a remote operator (such as an orchestra conductor) but only when the cue has first been set to a 'waiting for confirmation' state by the principal SCS operator or by an auto-start cue. See Cue-Start Confirmation for details. | |
| Manual+Conf | The cue state is set to 'waiting for confirmation' manually, ie by any of the methods available for Manual (Go Button). |
| Auto+Conf | The cue state is set to 'waiting for confirmation' as for an Auto Start cue. |
It is recommended that hot keys be defined after the last scheduled cue. Also, you cannot use a scheduled cue as a hot key cue. If you want to use a sound file for a scheduled cue and also for a hot key then enter two cues - one scheduled cue and one hot key cue.
| Tip: Hot keys are a useful way of supplementing an atmos cue with random extra sounds. For example, if you require a 'forest atmos' cue to run for a few minutes, you could have a suitable forest ambience audio file as a scheduled cue, set to loop continuously until you stop the cue. You could also set up a couple of animal or bird sounds on separate hot keys, and play these randomly during the 'forest atmos' cue. Just make sure the levels of the hot key cues are set appropriately for the cue they are going to supplement; use the pan control so that you don't have all the animals and birds in the centre (assuming you're running a stereo mix); and finally make sure that the animals and birds selected are native to the geography of the setting! And don't go overboard with hot keys - normally the audience should not consciously notice the detail of an atmos cue. |
| Tip: Using the function keys F1-F12 for hot keys can be useful as it is an easy place to put label tape on the keyboard as the function keys are all in a row. |
Standby Control: This feature is primarily designed to provide a Repeat Last Cue capability. See Standby Cues for details.